
I should preface this article by saying this was not really my ‘first’ experience with canning. My mom would can some spaghetti sauce and salsa every year, and I was vaguely knowledgeable about the process, but I never had an active interest.Today, my interest has grown. As I have learned more about the benefits of natural, fresh, and preservative-free foods, I have developed an interest in canning. Besides this, canning seems to go naturally with gardening, which is another interest of mine. However, as a single guy, the process still seemed a little daunting.
Recently, I mentioned my interest in canning to a friend of mine named Randy. He said his family was actually going to be canning that afternoon and, much to my delight, he invited me to join them. It was good that this happened when it did. It was already October and this was the last time they planned to can until next year.
They had gotten a last batch of tomatoes and apples from local farms and orchards. The plan was to can a good supply of sliced tomatoes and applesauce.
Here is a glimpse of the produce:


Now, Randy’s family has quite a large amount of experience when it comes to canning. They do it often and have experimented with many different types of produce. They were good people to learn from and I was ready to give it a try.
I arrived a few minutes late and Randy and his wife had already sanitized the lids and jars. Obviously, sanitization is very important for the safety and success of your product. It’s not difficult, but you should definitely sanitize your jars right before you use them. You can reuse canning jars from year to year, but I learned that you should use new lids every time. This gives you a better chance of all your jars sealing.
Here is an army of jars getting ready for action:

To skin the tomatoes, we used a neat trick. You boil some water in a pot and drop the tomatoes in. It only takes about a minute, and then their skin will start to split. Remove them from the water and the skin will fall off with minimal effort. After skinning the tomatoes, we cut them up and added them to the jars.
After this, we set to work quartering apples. We planned to use a cool machine called a Victorio Strainer to make applesauce. The Victorio Strainer drastically simplifies the applesauce making process—but you could sure use the strainer for other things as well. We boiled the apples until they were mushy. Then, we started running them through the strainer. With a little bit of elbow grease, the strainer went to work removing the skins, seeds, and core while producing a nice applesauce for us. Here’s a picture of this slick contraption in action:

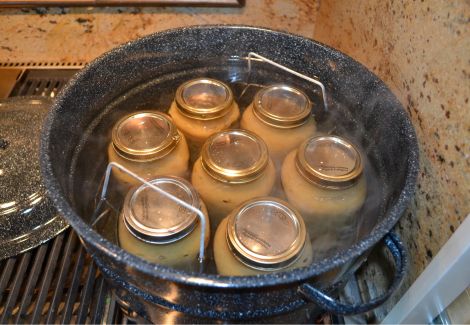
With a little sugar and cinnamon added, our applesauce was ready to go. It was time to start the canning process. Since both tomatoes and applesauce are rather acidic foods, we were able to use the water bath method to can them. A water bath is essentially a big pot designed for canning. It has a rack to hold the cans off the bottom of the pot, because the water needs to flow all around the cans when they are boiled. Here’s a photo of some applesauce in the water bath:
When adding the jars to the water bath, I learned a little about temperature. Strong differences in temperature can cause glass to crack. So, if your jar was full of cold fruits, you could not safely add them right into boiling water. However, because the contents (the apples and tomatoes) were already hot, we didn’t have to worry about the jars breaking in the boiling water.
We boiled the jars in the water bath for a few minutes longer than the recommended amount of time. Then we took them out of the water and let them sit on dishtowels to cool. Randy said, “If you set the jars directly on top of the granite, you have a greater risk of the glass cracking”. Again, this has to do with temperature differences affecting the glass. (The towels insulate the cold granite).
Randy and his son taking the cans out:


After the jars cool they are ready to store. But you need to make sure the lids are sealed. If a lid is bubbling up, the jar has not been sealed. This does not mean the food inside is bad. However, it will need to be placed in the refrigerator and eaten within a few days.
All in all, we canned 32 quarts (mostly of applesauce), and every one of the cans sealed. Randy attributed this to using a new lid on every one and knowing what he is doing ☺. If you’re careful and follow the directions, you’ll have the same success.
Here is a glimpse at our canned tomatoes:

After experiencing the whole process I realized it is really pretty easy. Of course, there is the initial start up cost, but the benefits of eating healthy foods that you canned yourself is a huge blessing. Plus, canning is a great activity to get family and friends involved with. Randy’s wife and 3 children gave us a lot of help. Whether it was slicing tomatoes, chopping apples, cranking the Victorio Strainer, heating water, or taste testing, everyone was involved.
Besides being educational for me, the children also learned a lot. They asked many questions about food, health, and the canning process. All of the interaction and excitement kept the kids interested. Plus, people say the best way to learn something is to try and do it. I’m looking forward to giving it a try myself next year.
Looking for more information on canning? Check out our article, “Canning from Napoleon to Popeye to You“. It has lots of information on how and why you should start, as well as practical advice from expert canners.
Or for more information on food preservation in general, you can check out the USDA’s website on home food preservation here.